🖼️ Using Vercel OG Image Generation With Any Framework
Vercel's @vercel/og library allows you to generate dynamic Open Graph images for social media using Edge Functions. It supports various features such as basic CSS layouts and custom fonts.
What is OG Image
The term OG is short for Open Graph, which is a protocol for
integrating web pages into the social graph. The OG image is often
referred to as the featured image or share image for a webpage, as
it is the image that is displayed when the page is shared on social
media platforms. The OG image is important because it helps to attract
the attention of users and can influence their decision to click on
the shared link and visit the webpage.
Integration outside Next.js
Integration with Next.js is well documented by Vercel but a limitation of Vercel’s Edge function is that is doesn’t support the JSX syntax.
🥈Using React Elements Objects
Vercel uses Satori to convert HTML and CSS to SVG which can be used
with JSX or
without JSX by
passing elements created by
React.createElement().
Each JSX element is just syntactic sugar for calling
React.createElement(component, props, ...children). So, anything you can do with JSX can also be done with just plain JavaScript.
🥇Importing .tsx to .ts
Importing .tsx files to .ts can be a useful way to avoid writing
React element objects when working with Vercel’s Edge function.
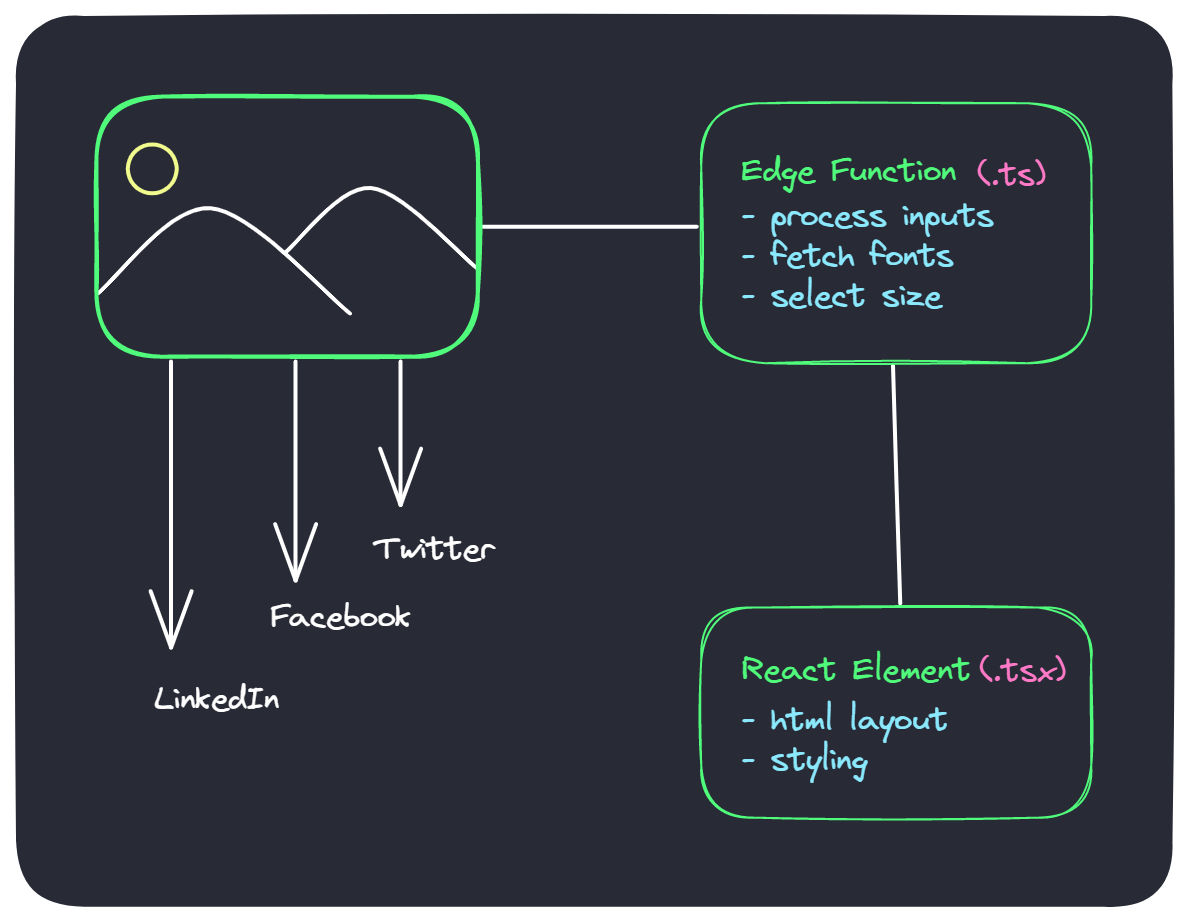
By importing your .tsx files into your .ts files, you can take
advantage of the benefits of JSX syntax without having to worry
about the Edge function’s lack of support for JSX. This can make
your code easier to read and write, especially if you are working with
complex React components.
Let’s take a look at an example of how you might do this in your code.
First, let’s create a simple OgComponent in a .tsx file at
api/OgComponent.tsx:
// This component accepts a title string as a prop
export const OgComponent = (title: string) => (
  // This JSX syntax is equivalent to calling React.createElement()
  <div
    style={{
      fontSize: 128,
      background: '#282A36',
      color: '#50FA7B',
      width: '100%',
      height: '100%',
      display: 'flex',
      textAlign: 'center',
      alignItems: 'center',
      justifyContent: 'center',
    }}>
    {title}
  </div>
);
// This component accepts a title string as a prop
export const OgComponent = (title: string) => (
// This JSX syntax is equivalent to calling React.createElement()
<div
style={{
fontSize: 128,
background: '#282A36',
color: '#50FA7B',
width: '100%',
height: '100%',
display: 'flex',
textAlign: 'center',
alignItems: 'center',
justifyContent: 'center',
}}>
{title}
</div>
);Now we can import OgComponent to our edge function at
api/[FUNCTION_NAME].ts:
import { ImageResponse } from '@vercel/og';

// Import the OgComponent from the .tsx file
import { OgComponent } from './ogComponent';

export const config = {
  runtime: 'edge',
};

export default async function (req: Request) {
  // Parse the query parameters from the request URL
  const { searchParams } = new URL(req.url);
  // Get the "title" query parameter, or use "Default Text"
  const title = searchParams.get('title') ?? 'Default Text';

  // Use the OgComponent in our Edge function
  return new ImageResponse(OgComponent(title), {
    width: 1200,
    height: 600,
  });
}
import { ImageResponse } from '@vercel/og';
// Import the OgComponent from the .tsx file
import { OgComponent } from './ogComponent';
export const config = {
runtime: 'edge',
};
export default async function (req: Request) {
// Parse the query parameters from the request URL
const { searchParams } = new URL(req.url);
// Get the "title" query parameter, or use "Default Text"
const title = searchParams.get('title') ?? 'Default Text';
// Use the OgComponent in our Edge function
return new ImageResponse(OgComponent(title), {
width: 1200,
height: 600,
});
}By importing the OgComponent from the .tsx file, we can use JSX
syntax to create a React element for the component and pass it to the
ImageResponse constructor. This allows us to take advantage of the
benefits of JSX syntax while still using the Edge function.
Usage
After you have deployed the edge function to you should be able to
browse to [DOMAIN]/api/[FUNCTION_NAME]?title=DYNAMIC_TEXT to see the
generated image.
For example browsing to https://htomar.dev/api/ogDemo?title=Hello World!🌏 will generate this image.
To create the web content for your social media post using the Open Graph Protocol, you can follow these steps:
- In the
<head>of your webpage, create a<meta>tag. - Add a
propertyattribute to the<meta>tag with the valueog:image. - Add a
contentattribute to the<meta>tag with the absolute path of the/api/ogendpoint as the value.
<head>
  <title>Hello world 🌏</title>
  <meta
    property="og:image"
    content="https://htomar.dev/api/ogDemo?title=Hello World!" />
</head><head>
<title>Hello world 🌏</title>
<meta
property="og:image"
content="https://htomar.dev/api/ogDemo?title=Hello World!" />
</head>